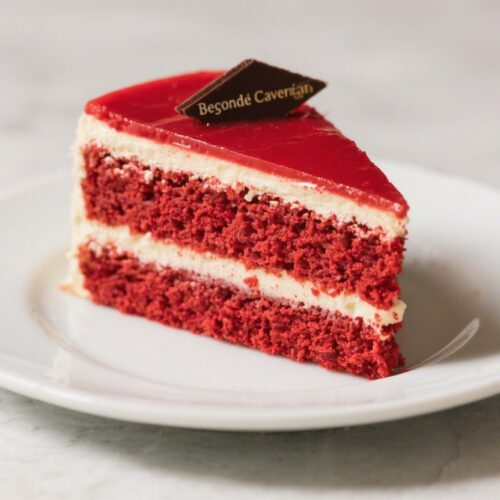
Red Velvet Dessert Beyond Classic Cake – A Fresh Take on a Favorite
Red velvet is more than a layer cake with cream cheese frosting. It’s a flavor—soft cocoa, gentle tang, and that signature red—that can shine in all kinds of desserts. This recipe turns the classic into a creamy, no-bake layered treat you can make any time.
It’s rich but light, familiar yet a little unexpected. If you love red velvet but want something easier than a full cake, this is your new go-to.
What Makes This Special
Red Velvet Dessert Beyond Classic Cake - A Fresh Take on a Favorite
Ingredients
- For the crust: 2 cups chocolate wafer cookie crumbs (or chocolate graham crackers, crushed)
- 6 tablespoons unsalted butter, melted
- 1 tablespoon granulated sugar
- Pinch of fine salt
- For the red velvet layer: 12 ounces cream cheese, softened
- 3/4 cup granulated sugar
- 1/4 cup sour cream
- 1/3 cup buttermilk
- 2 tablespoons unsweetened cocoa powder
- 1 teaspoon vanilla extract
- 1 teaspoon white vinegar or lemon juice
- 2 envelopes unflavored gelatin (about 14 g) or 1 tablespoon powdered gelatin
- 1/4 cup cold water (for blooming gelatin)
- 1–2 teaspoons red gel food coloring (adjust to your shade)
- Pinch of salt
- For the topping: 1 1/2 cups heavy cream, cold
- 3 tablespoons powdered sugar
- 1/2 teaspoon vanilla extract
- Optional: chocolate shavings or red velvet crumb for garnish
Instructions
- Prepare the pan: Line an 8x8-inch square pan with parchment, leaving overhang for easy lifting. Lightly grease the sides.
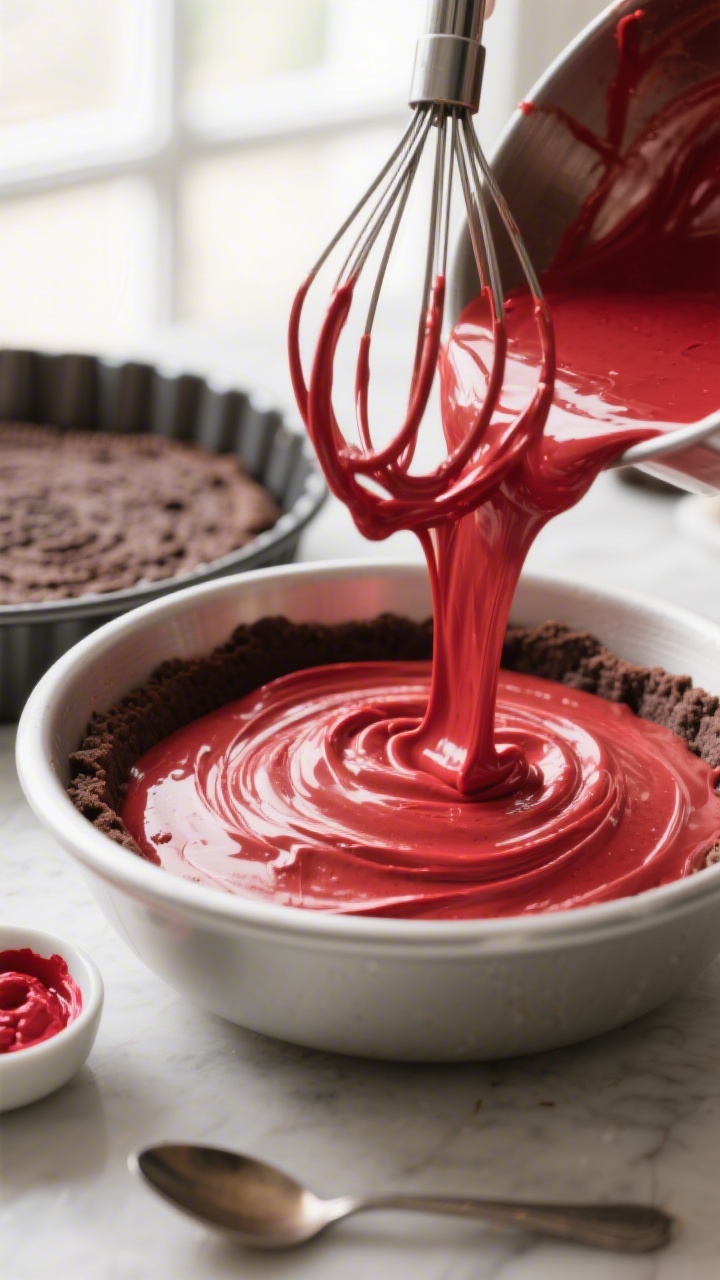
- Make the crust: Mix cookie crumbs, melted butter, sugar, and a pinch of salt until the texture resembles wet sand. Press firmly into the pan. Chill while you make the filling.
- Bloom the gelatin: Sprinkle gelatin over 1/4 cup cold water in a small bowl. Let stand 5 minutes until spongy.
- Whip the base: In a large bowl, beat cream cheese and sugar until smooth and fluffy. Blend in sour cream, cocoa, vanilla, vinegar, and salt.
- Add the color and tang: Mix in buttermilk, then add red gel food coloring a little at a time until you reach a deep, vibrant red. Go slow; gel is potent.
- Melt the gelatin: Gently warm the bloomed gelatin in the microwave in 5–10 second bursts or over a hot water bath until just dissolved. Do not boil.
- Stabilize the filling: With the mixer running on low, stream the warm gelatin into the red velvet mixture until fully combined.
- Assemble: Pour the filling over the chilled crust. Smooth the top. Tap the pan to release air bubbles.
- Chill: Refrigerate at least 4 hours, preferably overnight, until set and sliceable.
- Make the topping: Whip cold heavy cream, powdered sugar, and vanilla to medium peaks. Spread over the chilled red velvet layer.
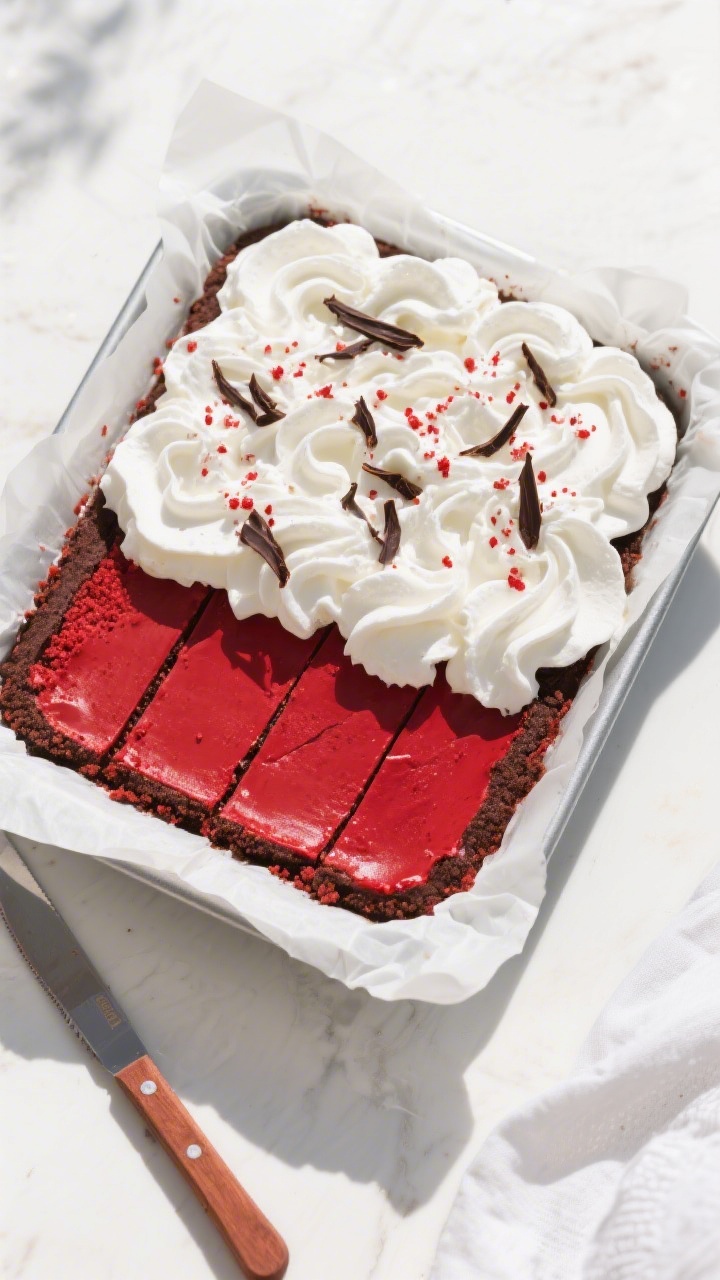
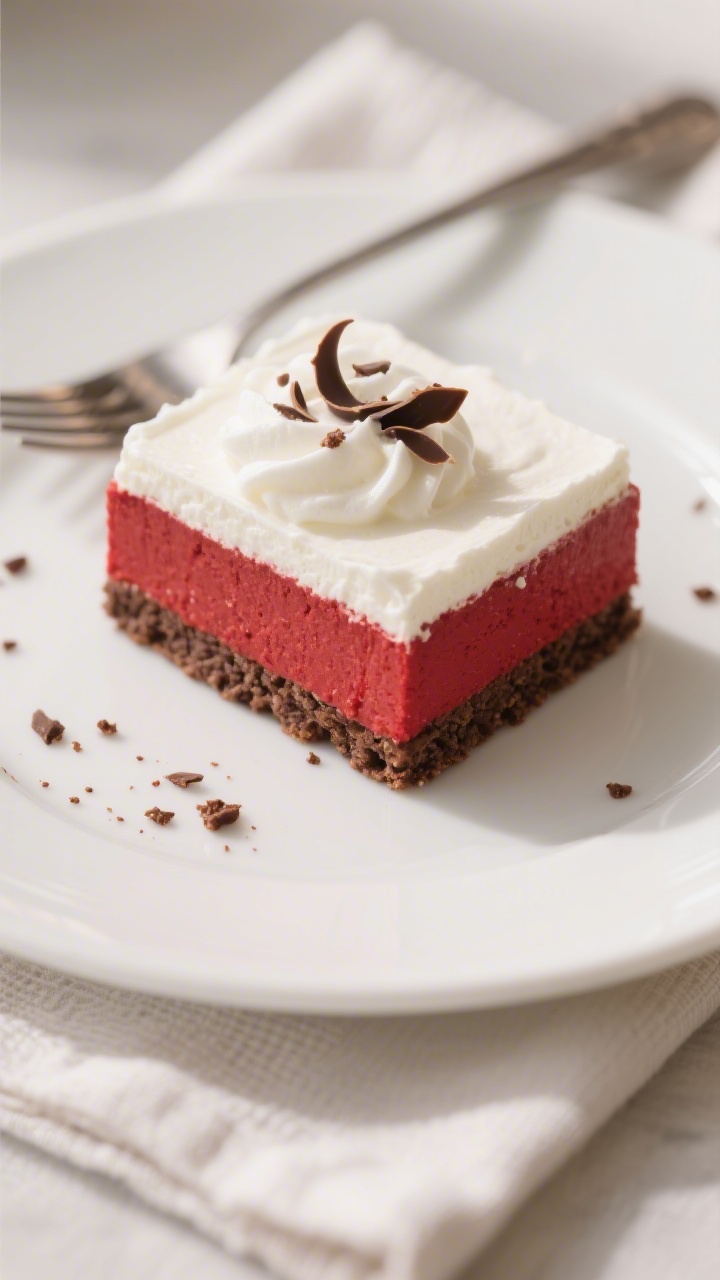
- Garnish and serve: Add chocolate shavings or a sprinkle of crumbs. Lift out using the parchment and cut into squares with a warm, dry knife.

This dessert combines a crumbly chocolate cookie base, a velvety red filling, and a cloud of whipped cream on top. It’s set in a pan, not baked, so it’s weeknight-friendly and party-ready.
The flavor leans classic red velvet—subtle cocoa and a hint of buttermilk tang—without the fuss of layers. It slices cleanly, looks striking, and tastes like a celebration.
What You’ll Need
- For the crust:
- 2 cups chocolate wafer cookie crumbs (or chocolate graham crackers, crushed)
- 6 tablespoons unsalted butter, melted
- 1 tablespoon granulated sugar
- Pinch of fine salt
- For the red velvet layer:
- 12 ounces cream cheese, softened
- 3/4 cup granulated sugar
- 1/4 cup sour cream
- 1/3 cup buttermilk
- 2 tablespoons unsweetened cocoa powder
- 1 teaspoon vanilla extract
- 1 teaspoon white vinegar or lemon juice
- 2 envelopes unflavored gelatin (about 14 g) or 1 tablespoon powdered gelatin
- 1/4 cup cold water (for blooming gelatin)
- 1–2 teaspoons red gel food coloring (adjust to your shade)
- Pinch of salt
- For the topping:
- 1 1/2 cups heavy cream, cold
- 3 tablespoons powdered sugar
- 1/2 teaspoon vanilla extract
- Optional: chocolate shavings or red velvet crumb for garnish
Instructions
- Prepare the pan: Line an 8×8-inch square pan with parchment, leaving overhang for easy lifting. Lightly grease the sides.
- Make the crust: Mix cookie crumbs, melted butter, sugar, and a pinch of salt until the texture resembles wet sand.Press firmly into the pan. Chill while you make the filling.
- Bloom the gelatin: Sprinkle gelatin over 1/4 cup cold water in a small bowl. Let stand 5 minutes until spongy.
- Whip the base: In a large bowl, beat cream cheese and sugar until smooth and fluffy.Blend in sour cream, cocoa, vanilla, vinegar, and salt.
- Add the color and tang: Mix in buttermilk, then add red gel food coloring a little at a time until you reach a deep, vibrant red. Go slow; gel is potent.
- Melt the gelatin: Gently warm the bloomed gelatin in the microwave in 5–10 second bursts or over a hot water bath until just dissolved. Do not boil.
- Stabilize the filling: With the mixer running on low, stream the warm gelatin into the red velvet mixture until fully combined.
- Assemble: Pour the filling over the chilled crust. Smooth the top.Tap the pan to release air bubbles.
- Chill: Refrigerate at least 4 hours, preferably overnight, until set and sliceable.
- Make the topping: Whip cold heavy cream, powdered sugar, and vanilla to medium peaks. Spread over the chilled red velvet layer.
- Garnish and serve: Add chocolate shavings or a sprinkle of crumbs. Lift out using the parchment and cut into squares with a warm, dry knife.
Keeping It Fresh
Store covered in the refrigerator for up to 4 days.
Keep the whipped topping off until the day you serve for the best texture. If you need to make it ahead, assemble the crust and filling, chill overnight, then add whipped cream a few hours before serving. For short-term transport, keep it cold with an ice pack; it softens if left out too long.
Health Benefits
– Cream cheese and buttermilk provide protein and calcium, which support bones and muscle function. – Cocoa adds small amounts of flavanols, known for antioxidant properties. – Using a stabilized filling with gelatin helps you serve clean portions, often leading to smaller, more mindful servings. – You can lower sugar slightly and still keep the flavor balanced, especially if your topping isn’t too sweet.
Pitfalls to Watch Out For
– Over-coloring: Too much liquid dye can throw off the texture and taste.
Use gel and add gradually. – Lumpy filling: Start with fully softened cream cheese and beat until smooth before adding liquids. – Grainy gelatin: Always bloom and melt gently. If it cools and clumps, rewarm until fluid before mixing in. – Soggy crust: Press crumbs firmly and chill well. If your crumbs are very fine, add an extra tablespoon of butter. – Over-whipped cream: Stop at medium peaks so the topping stays soft and sliceable.
Recipe Variations
– Red Velvet Cheesecake Bars: Swap the gelatin for 2 eggs and bake the filling at 325°F (165°C) for 25–30 minutes.
Cool and top with whipped cream. – Gluten-Free: Use gluten-free chocolate cookies for the crust. – Lighter Option: Use Neufchâtel cheese and reduce sugar by 2–3 tablespoons. – Chocolate Swirl: Drizzle 1/3 cup melted semisweet chocolate over the filling and marble with a knife before chilling. – Mini Cups: Build in small jars or silicone molds for individual servings and easy transport. – Citrus Lift: Add 1 teaspoon orange zest to the filling for a bright note that pairs well with cocoa.
FAQ
Can I make this without gelatin?
Yes. Use 1 tablespoon agar-agar powder simmered in 1/2 cup water for 2 minutes, then cool slightly and mix in. The texture will be a bit firmer.
What if I don’t have buttermilk?
Mix 1/3 cup milk with 1 teaspoon vinegar or lemon juice, let stand 5 minutes, and use as a substitute.
Which red food coloring works best?
Gel or paste food coloring gives strong color without adding extra liquid.
Start with 1 teaspoon and adjust.
Can I freeze it?
You can freeze the base and filling (without whipped topping) for up to 1 month. Thaw overnight in the fridge, then add the whipped cream before serving.
How do I get clean slices?
Chill well, use a sharp knife warmed under hot water, and wipe the blade between cuts.
Is the cocoa flavor strong?
No. Red velvet traditionally has a subtle cocoa note.
If you prefer more, increase cocoa to 3 tablespoons and add 1 extra tablespoon sugar.
Wrapping Up
This red velvet dessert brings the beloved flavor to a no-bake, party-friendly pan. It’s eye-catching, creamy, and simple to make ahead. With a few small tweaks, you can tailor it to your taste or dietary needs.
Keep this in your back pocket for birthdays, holidays, or any time you want a sweet that feels a little special without a lot of work.
Printable Recipe Card
Want just the essential recipe details without scrolling through the article? Get our printable recipe card with just the ingredients and instructions.